
Elastic Stack: The Basics Walkthrough
Understand how SOC analysts use the Elastic Stack (ELK) for log investigations. Elastic basics and introduction for beginners.
Elastic Stack (ELK) was originally developed to store, search, and visualize large amounts of data. Organizations used it to monitor application performance and perform searches on large datasets. Over time, its features made it popular in security operations as well. Now, many SOC teams use ELK almost as a SIEM solution.
Elastic Stack is a collection of different open-source components that work together to collect data from any source, store and search it, and visualize it in real time.
 Before we go on to learning log analysis through ELK, let’s first discuss its core components.
Note: As a SOC analyst, your primary responsibility is to work with ELK to perform log analysis and investigations. You do not need to specialize in how each component behind the ELK works. However, taking a basic understanding of these components is essential.
1. Elasticsearch
The first component, Elasticsearch, is a full-text search and analytics engine for JSON-formatted documents. It stores, analyzes, and correlates data and supports a RESTful API for interacting with it.
2. Logstash
Logstash is a data processing engine that takes data from different sources, filters it, or normalizes it, and then sends it to the destination, which could be Kibana or a listening port. A Logstash configuration file is divided into three parts, as shown below.
- The Input part is where the user defines the source from which the data is being ingested.
- The Filter part is where the user specifies the filter options to normalize the log ingested above.
- The Output part is where the user wants the filtered data to be sent. It can be a listening port, Kibana Interface, Elasticsearch database, or file.
Logstash supports many Input, Output, and Filter plugins. 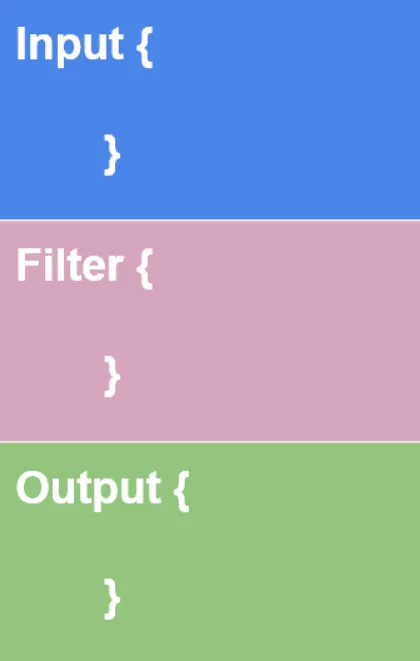
3. Beats
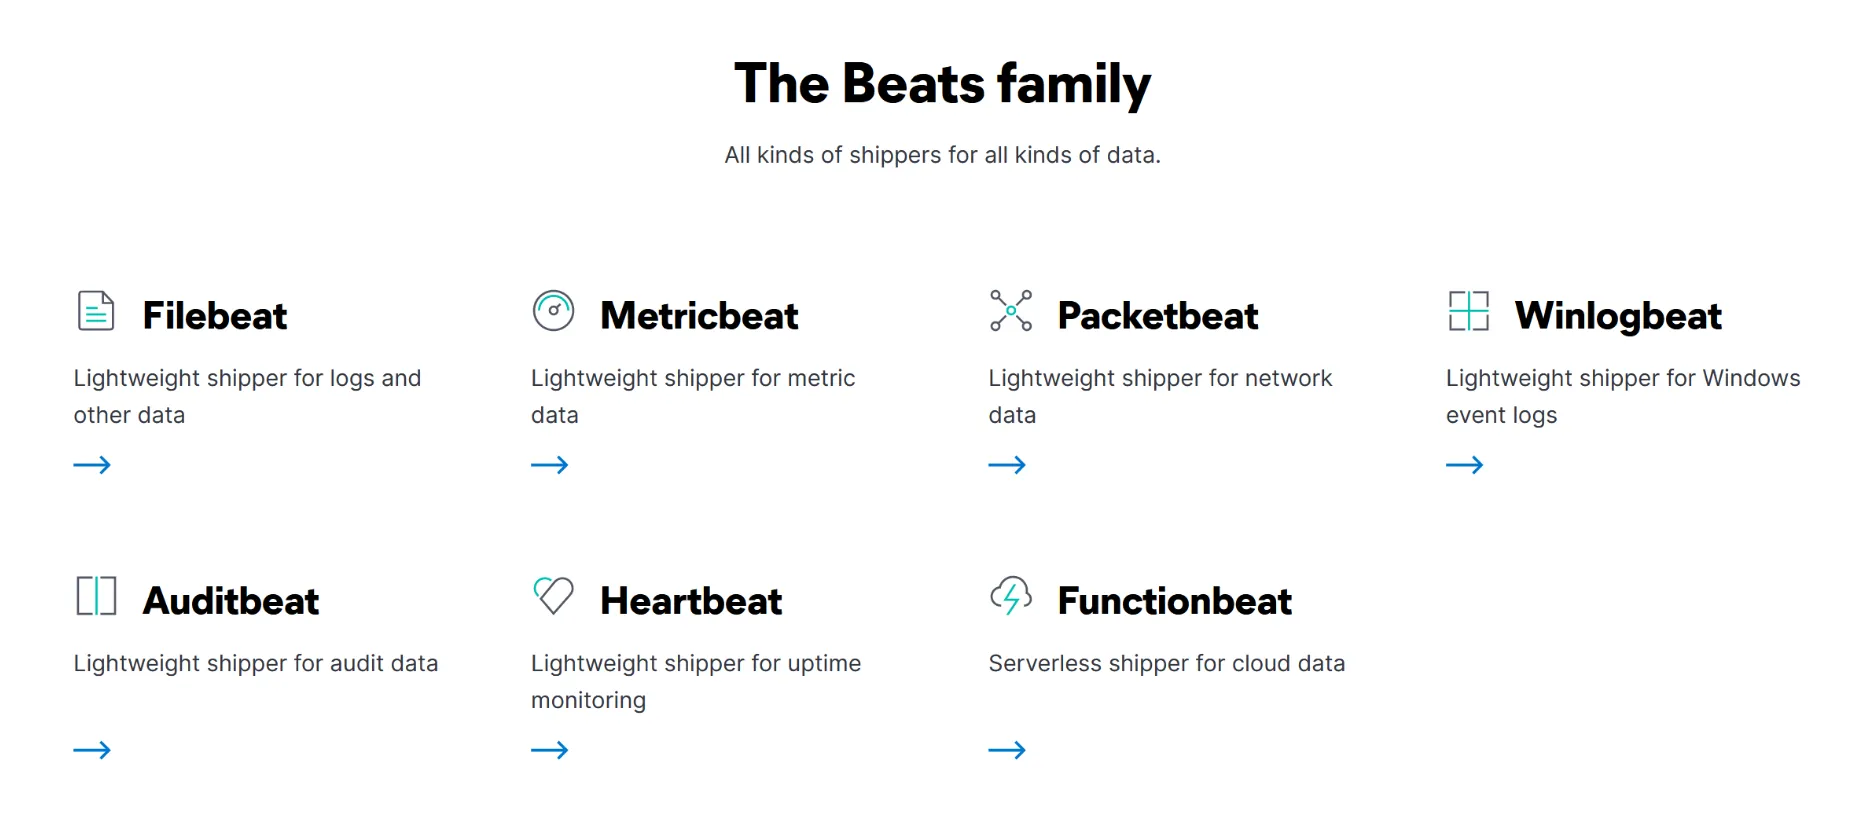
Beats are host-based agents known as data-shippers that ship/transfer data from the endpoints to Elasticsearch. Each beat is a single-purpose agent that sends specific data to Elasticsearch. All available beats are shown below.
4. Kibana
Kibana is a web-based data visualization tool that works with Elasticsearch to analyze, investigate, and visualize data streams in real time. It allows users to create multiple visualizations and dashboards for better visibility. There is more on Kibana in the following tasks.
How they work together:
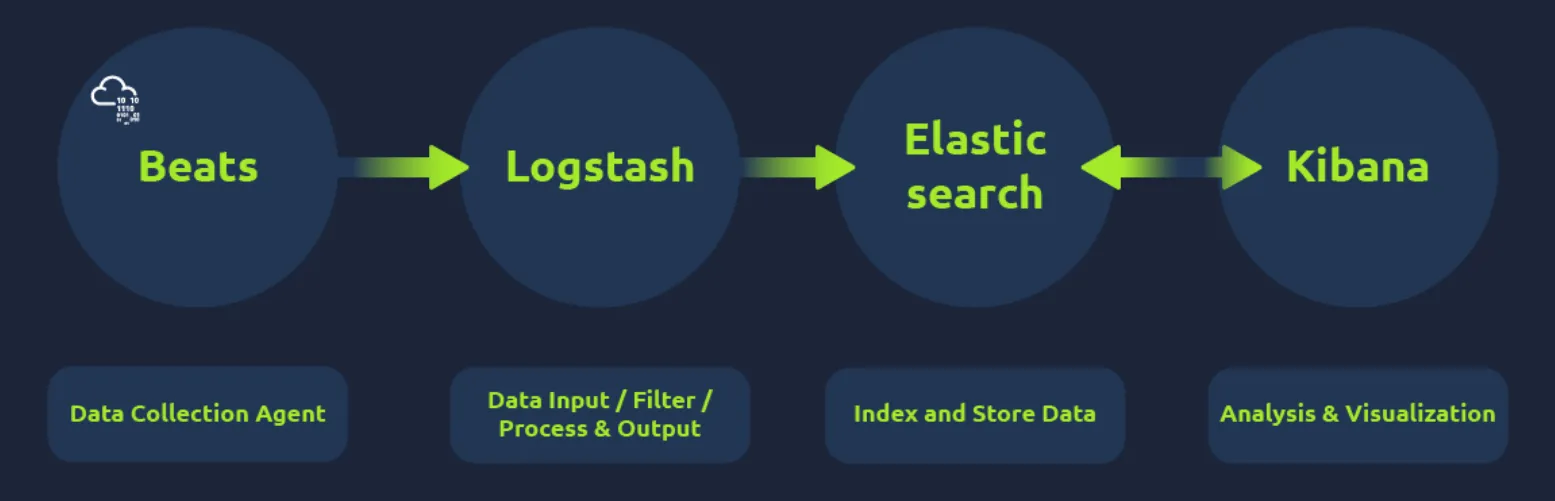
Now that we have learned about all the components of the Elastic Stack, let’s see how these components work together step-by-step:
- Beats collect data from multiple agents. For example, Winlogbeat collects Windows event logs, and Packetbeat collects network traffic flows.
- Logstash collects data from beats, ports, or files, parses/normalizes it into field value pairs, and stores them into Elasticsearch.
- Elasticsearch acts as a database used to search and analyze data.
- Kibana is responsible for displaying and visualizing the data stored in Elasticsearch. The data stored in Elasticsearch can easily be shaped into different visualizations, time charts, infographics, etc., using Kibana.
QUESTIONS:
Logstash is used to visualize the data. (yay / nay)
Answer: nay
Elasticstash supports all data formats apart from JSON. (yay / nay)
Answer: nay
Discover Tab
The Discover tab is where the SOC analysts spend most of their time. This tab shows the ingested logs, the search bar, normalized fields, and more. Analysts can search for the logs, investigate anomalies, and apply filters based on search terms and time periods.
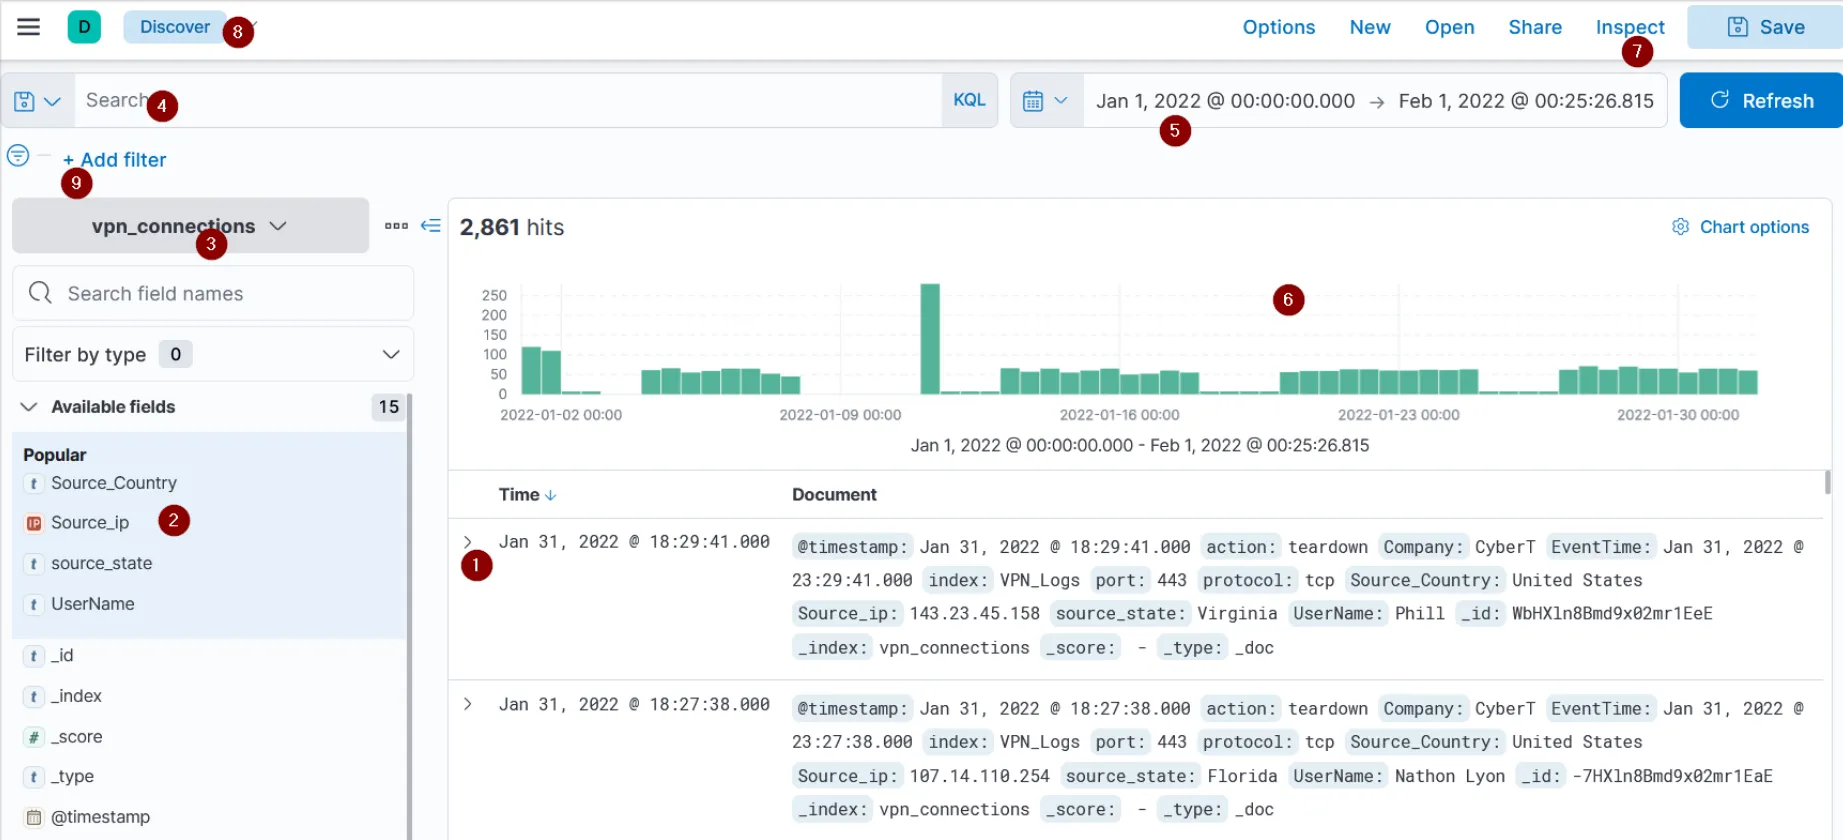 Let’s briefly see what each element (as highlighted in the above screenshot) of the Discover tab does:
- **Logs
**Each row shows a single log containing information about the event, along with the fields and values found in that log. - **Fields Pane
**The left panel of the interface shows the list of fields parsed from the logs. We can click on any field to add it to the filter or remove it from the search. - **Index Pattern
**Each type of log is stored in a different index pattern. We can select the index pattern from which we need the logs. For example, for VPN logs, we would need to select the index pattern in which VPN logs are stored. - **Search Bar
**It is a place where the user adds search queries and applies filters to narrow down the results. In the next task, we will learn how to perform searches through queries. - **Time Filter
**We can narrow down results based on any specific time duration. - **Time Interval
**This chart shows the event counts over time. - **TOP Bar
**This bar contains various options to save the search, open the saved searches, share or save the search, etc. - **Discover Tab
**This is the main workspace in Kibana for exploring, searching, and analyzing raw data. - **Add Filter
**We can apply filters to specific fields to narrow down results, rather than manually typing entire queries.
Some of the important elements found in the Discover tab are briefly explained below:
Index Pattern
By default, Kibana requires an index pattern to access the data stored/ingested in Elasticsearch. The index pattern tells Kibana which elasticsearch data we want to explore. Each Index pattern corresponds to certain defined properties of the fields. A single index pattern can point to multiple indices.
Each log source has a different log structure; therefore, when logs are ingested into Elasticsearch, they are first normalized into corresponding fields and values by creating a dedicated index pattern for the data source.
In the attached lab, we will explore the index pattern vpn_connections which contains the VPN logs. 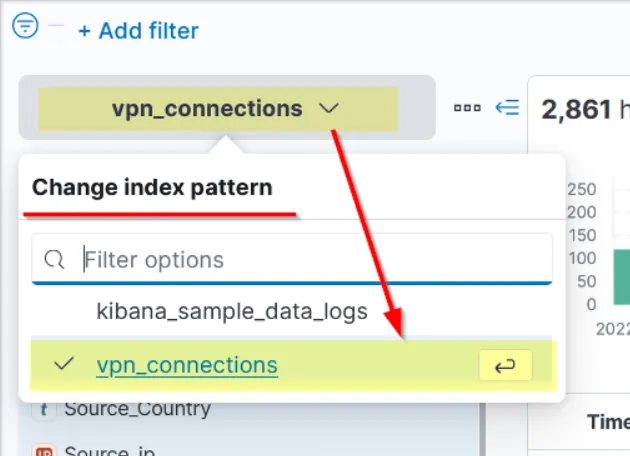
Fields Pane
The left panel in the Discover tab shows the list of the normalized fields it finds in the available logs. Click on any field, and it will show the top 5 values and the percentage of occurrence.
We can use these values to apply filters to them. Clicking on the + button will add a filter to show the logs containing this value, and the - button will add a filter to show the results that do not have this value. 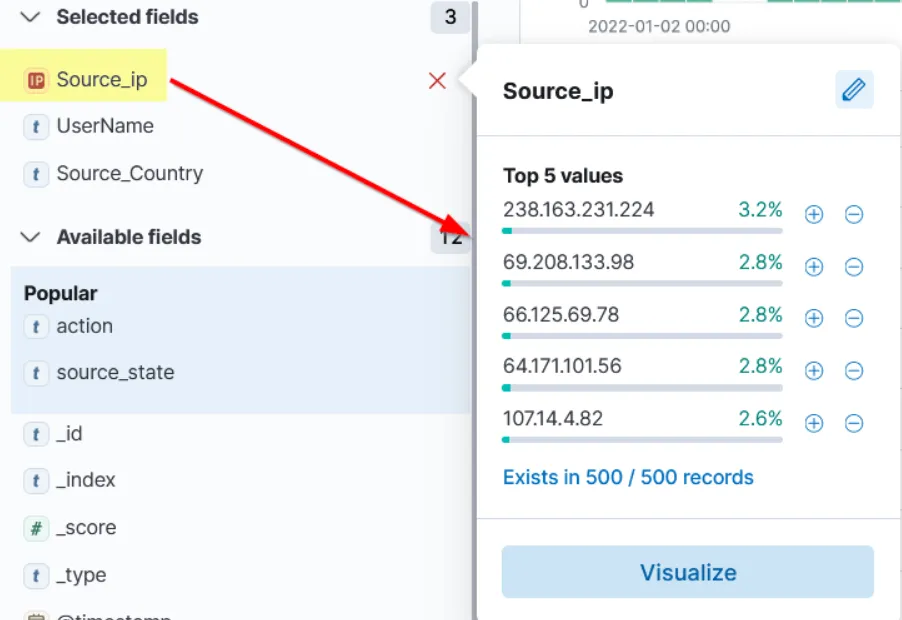 We can also apply filters to any of the fields shown in the panel on the left. All we have to do is click the
Add filter option under the search bar, which will allow us to apply a filter to the fields shown below.
Time Filter
The time filter allows us to apply a log filter based on time. It has many options. 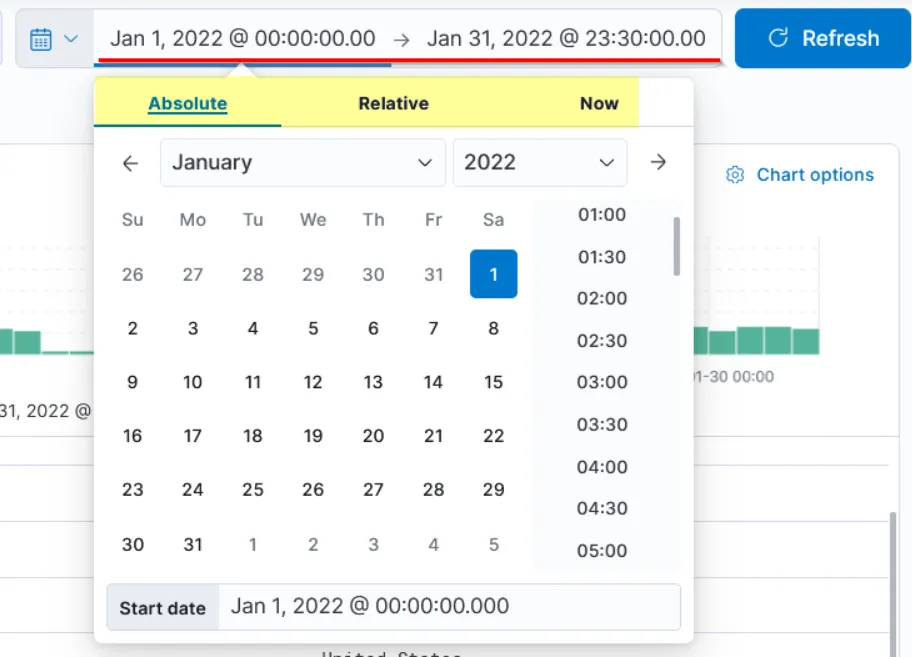
Timeline
The timeline pane provides an overview of the number of events that occurred for the time/date, as shown below. We can only select the bar to show the logs in that period. The count at the top left displays the number of events found in the specified time. This bar is also helpful in identifying the spike in the logs. In the above screenshot, we can see an unusual log spike on 11th January 2022. 
Create Table
By default, the logs are shown in raw form. We can click on any log and select important fields to create a table showing only those fields. This method reduces the noise and makes it more presentable and meaningful.
You can also save the table format once it is created. It will then show the same fields every time a user logs into the dashboard.
Time range check: Before answering the data questions, set the Kibana time picker to include January 2022. A wide range such as Last 15 years also works for this lab.
QUESTIONS:
Select the index vpn_connections and filter from 31st December 2021 to 2nd Feb 2022. How many hits are returned?
First of all, we need to select the index on the left side and the data in absolute mode in order to choose the precise data and set what is required (on the right side). 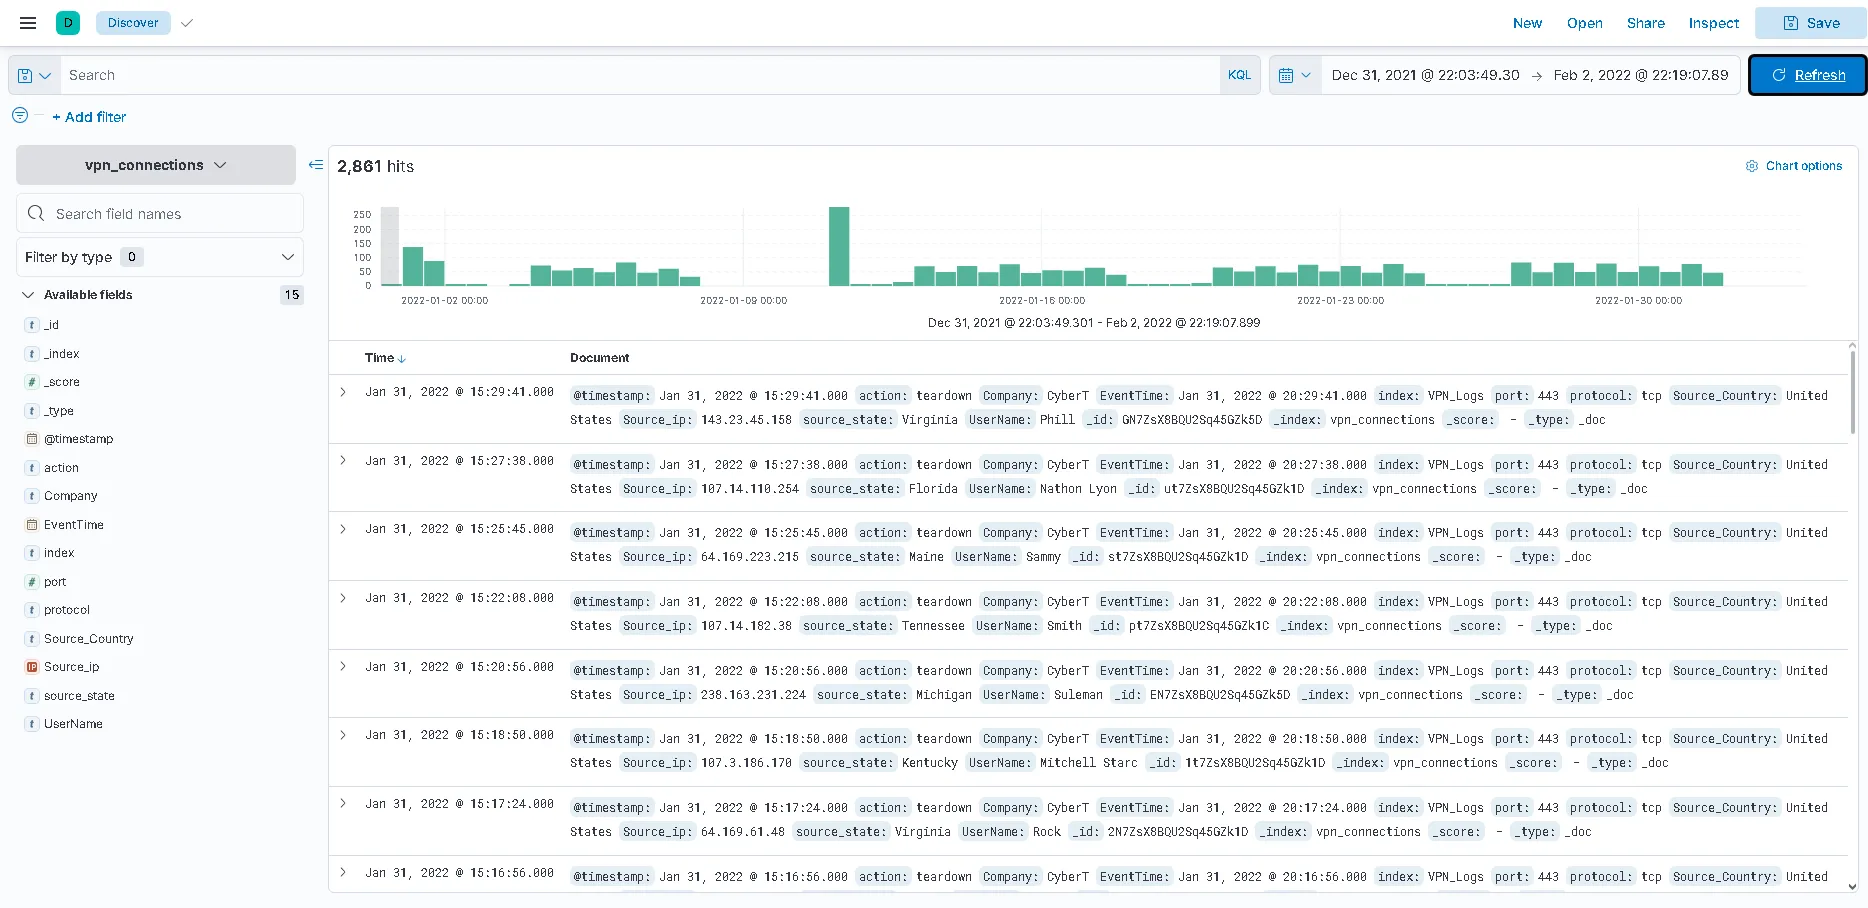 Answer: 2861
Which IP address has the maximum number of connections?
We can select, from the filters, the source_ip. As we can see 238.163.231.224 is the number one user with 3.2%. 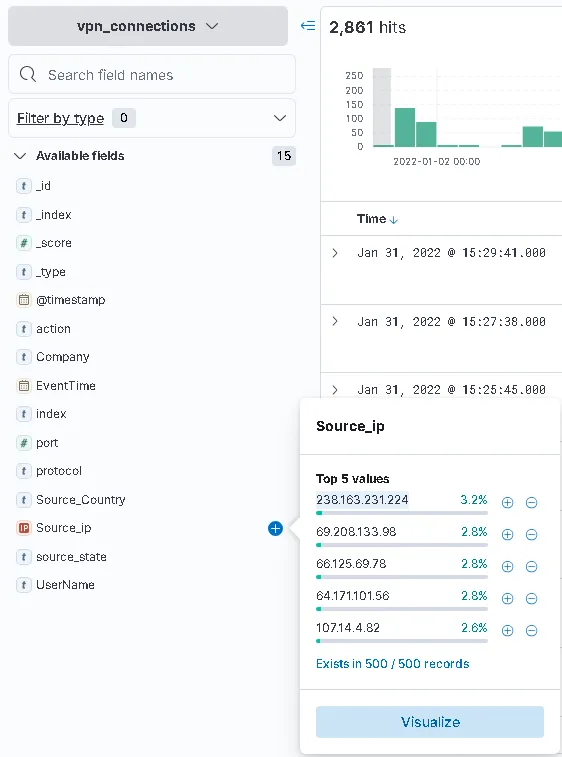 Answer: 238.163.231.224
Which user is responsible for the overall maximum traffic?
In the same way we can see the UserName, top 1 being James with 4.0%. 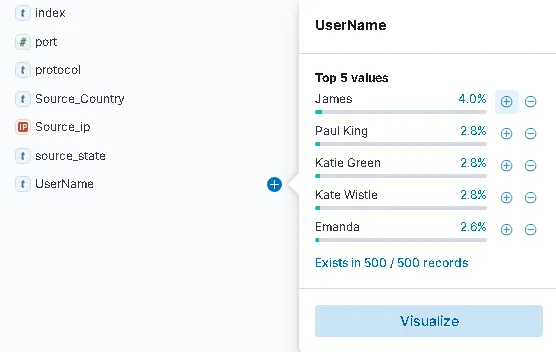 Answer: James
Apply Filter on UserName Emanda; which SourceIP has max hits?
First, select Emanda from UserName and then look at the SourceIP.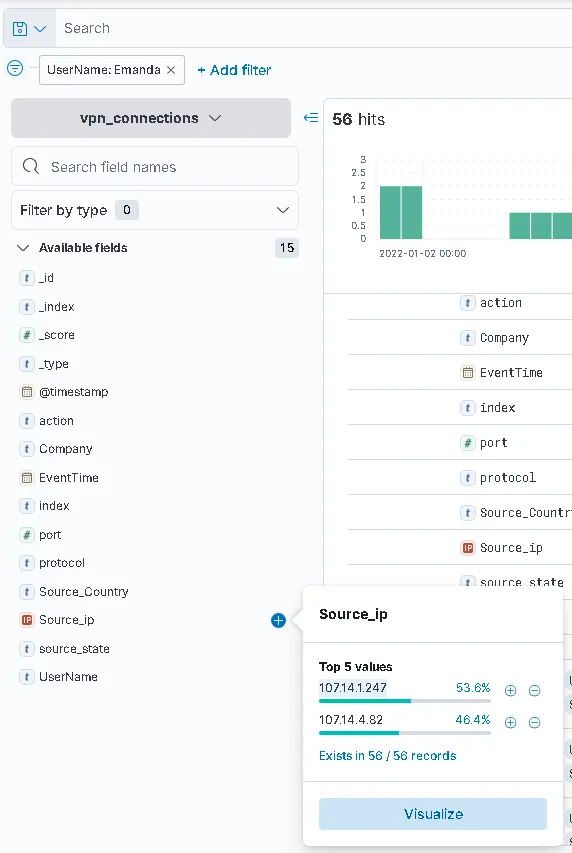 Answer: 107.14.1.247
On 11th Jan, which IP caused the spike observed in the time chart?
We are setting the date from Jan 11, 2022 00:00:00 - Jan 11, 2022 23:30:00.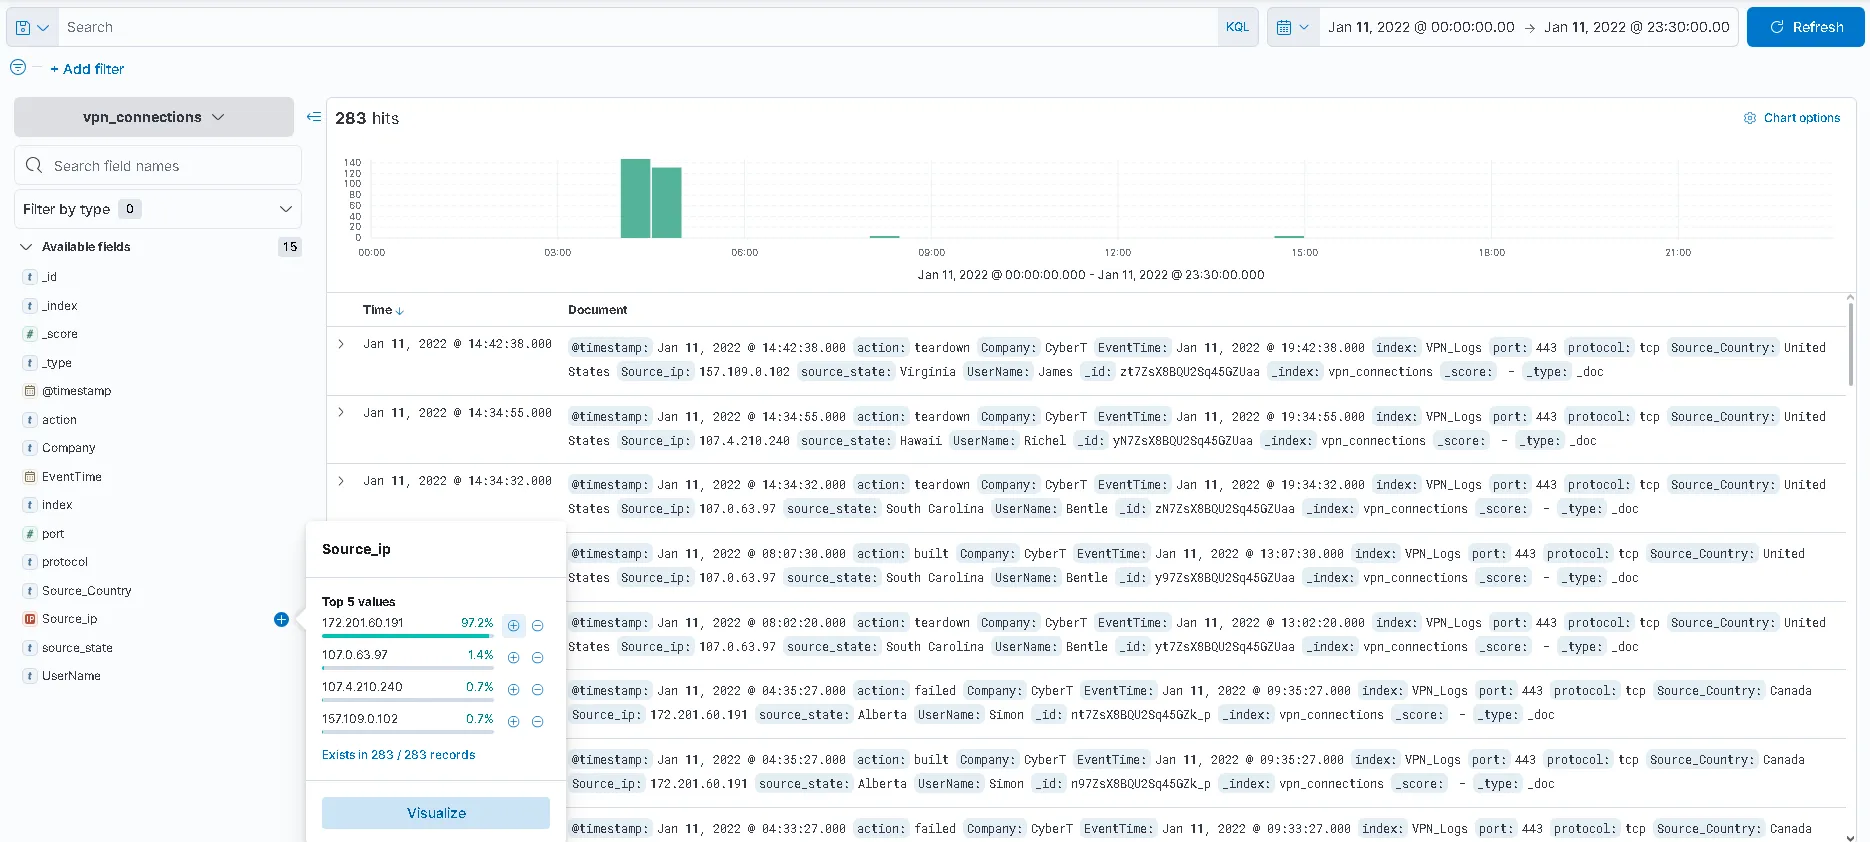 Answer: 172.201.60.191
How many connections were observed from IP 238.163.231.224, excluding the New York state?
We are setting the date to a more general one and we can filter by IP mentioned in the question and also exclude NYS.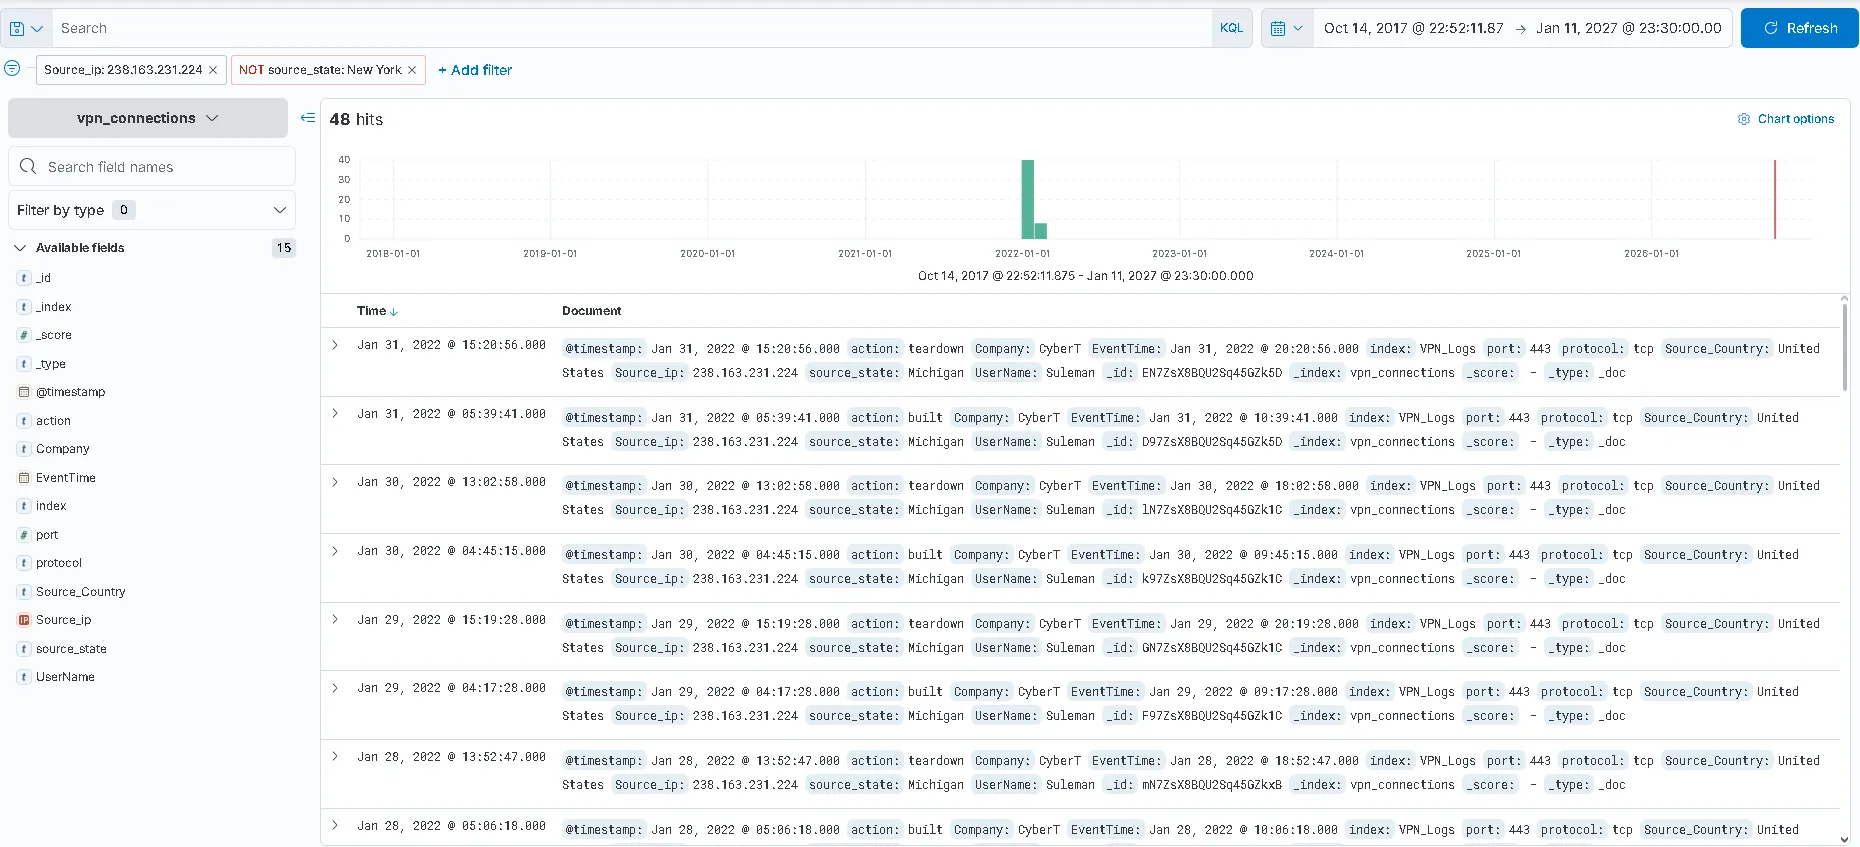 Answer: 48
KQL Overview
Remember the Search Bar we saw in the Discover Tab in the previous task? We can find anything using this option. Let’s see how.
There is a special language that we can use inside this search bar to perform our searches. KQL (Kibana Query Language) is a search query language used to search the ingested logs/documents in Elasticsearch.
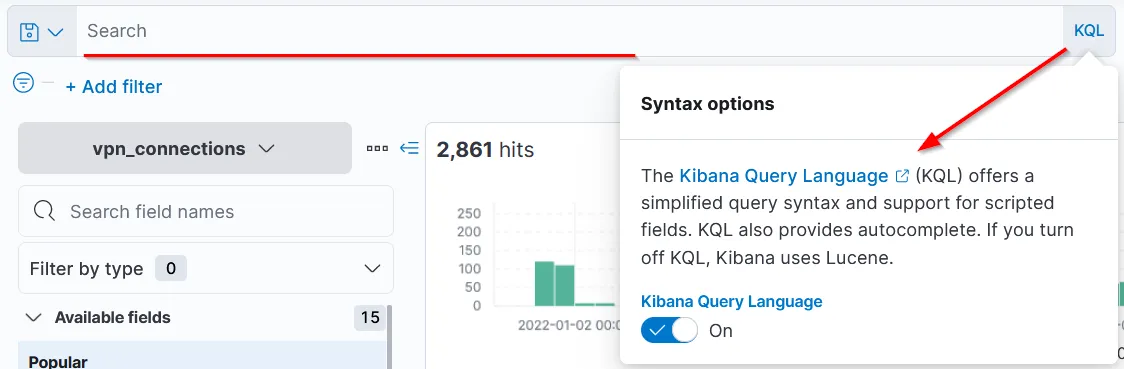
With KQL, we can search for the logs in two different ways.
- Free text search
- Field-based search
Free text Search
Free text search allows users to search for logs based on text only. That means a simple search of the term security will return all the documents that contain this term, irrespective of the field. Let’s search for the text United States in the search bar. It will return all the logs that contain this term, regardless of the place or the field. This search returned 2304 hits, as shown below.
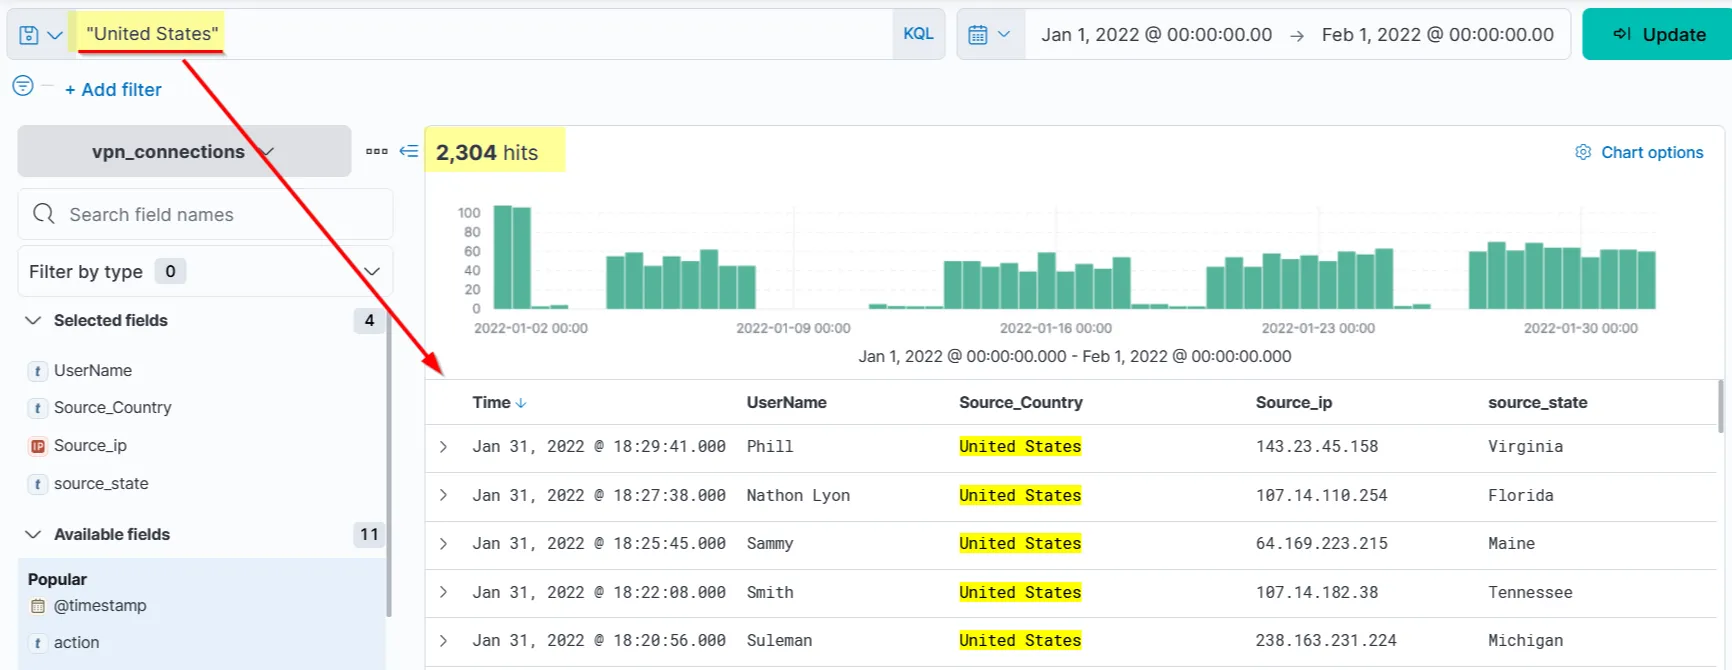
What if we only search for the term United? Do you think it will return any results? 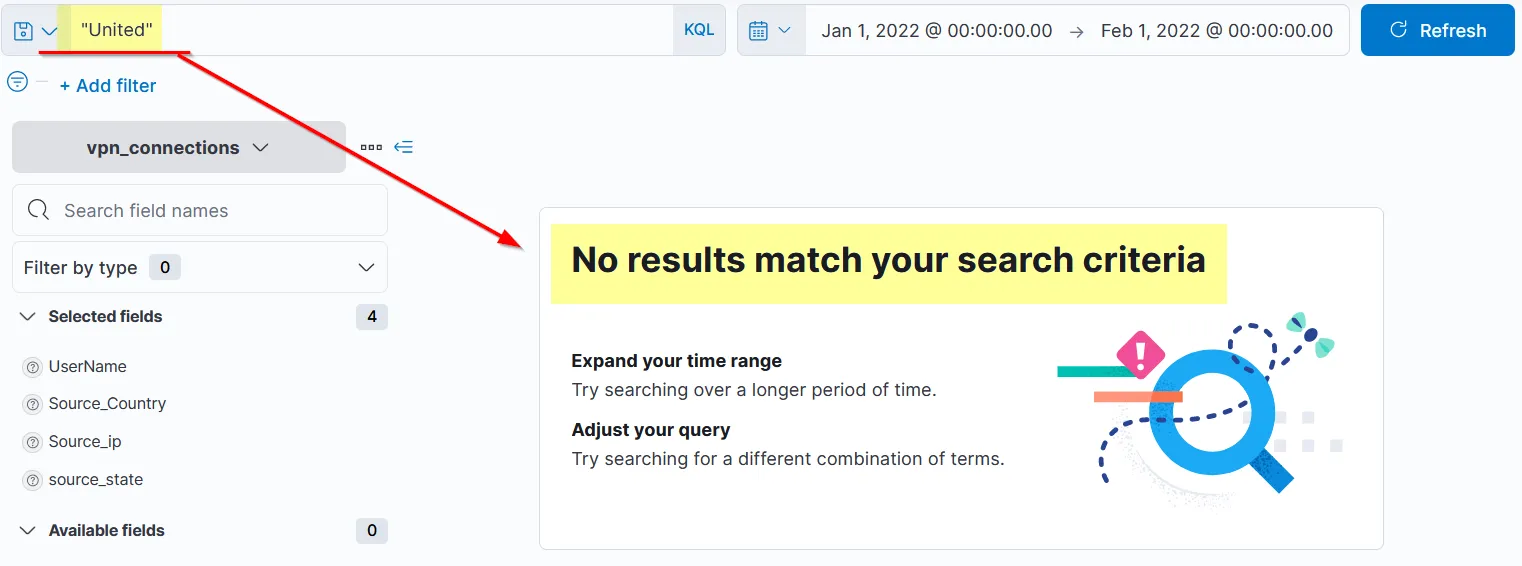
It didn’t return any results because KQL looks for the whole term/word in the documents.
KQL allows the wildcard * to match parts of the word. Let’s find out how to use this wild card in the search query.
Search Query: United*
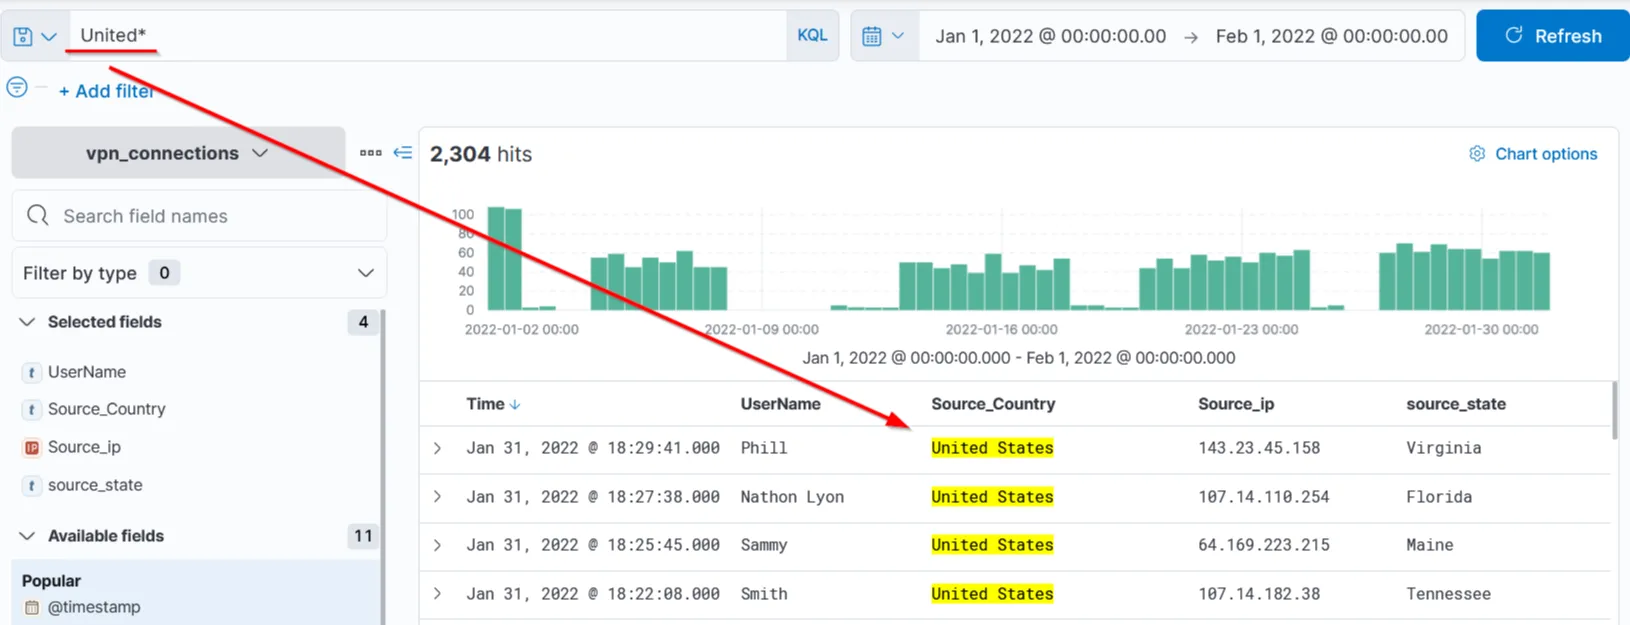
We have used the wildcard with the term United to return all the results containing the term United and any other term after it. If we had logs with the term United Nations. It would also have returned those as a result of this wildcard.
Logical Operators (AND | OR | NOT)
KQL also allows users to utilize logical operators in the search query. Let’s look at the examples below.
1. AND Operator
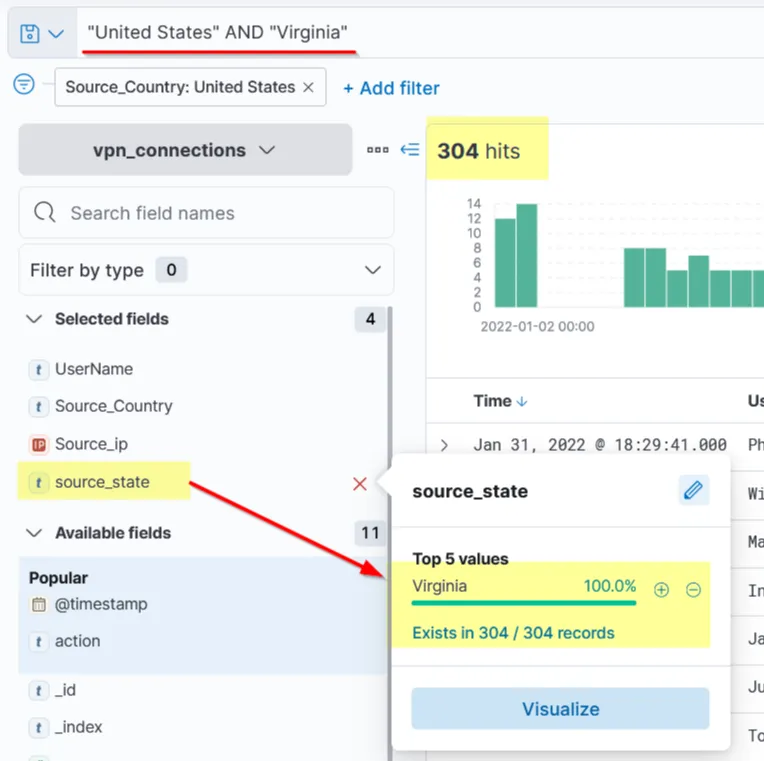
Here, we will use the AND Operator to create a search that returns the logs containing the terms "United States" and "Virginia".
Search Query: "United States" AND "Virginia"
2. OR Operator
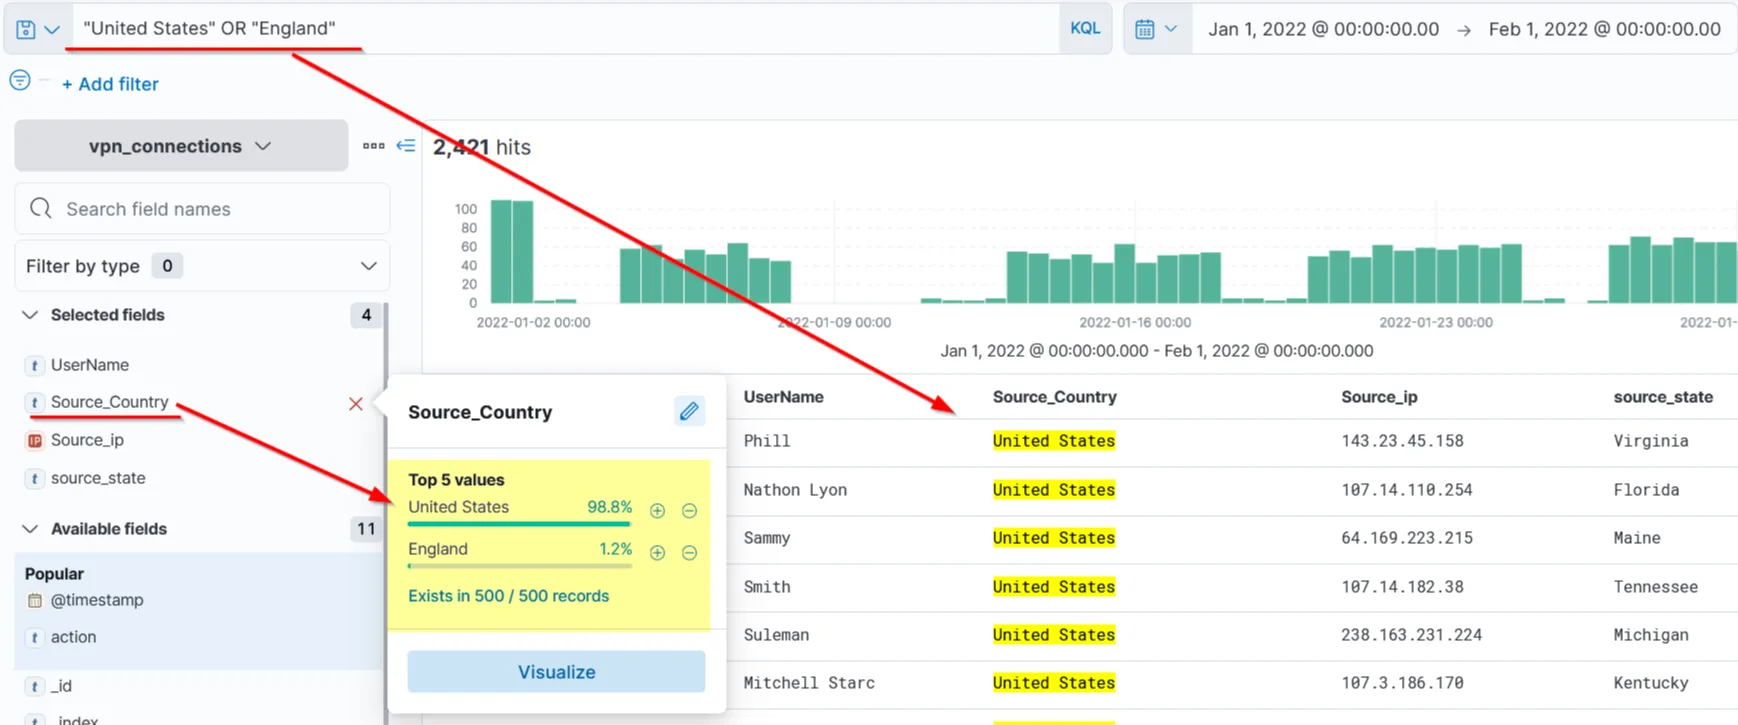
We will use the OR operator to show logs that contain either the United States or England.
Search Query: "United States" OR "England"
3. NOT Operator
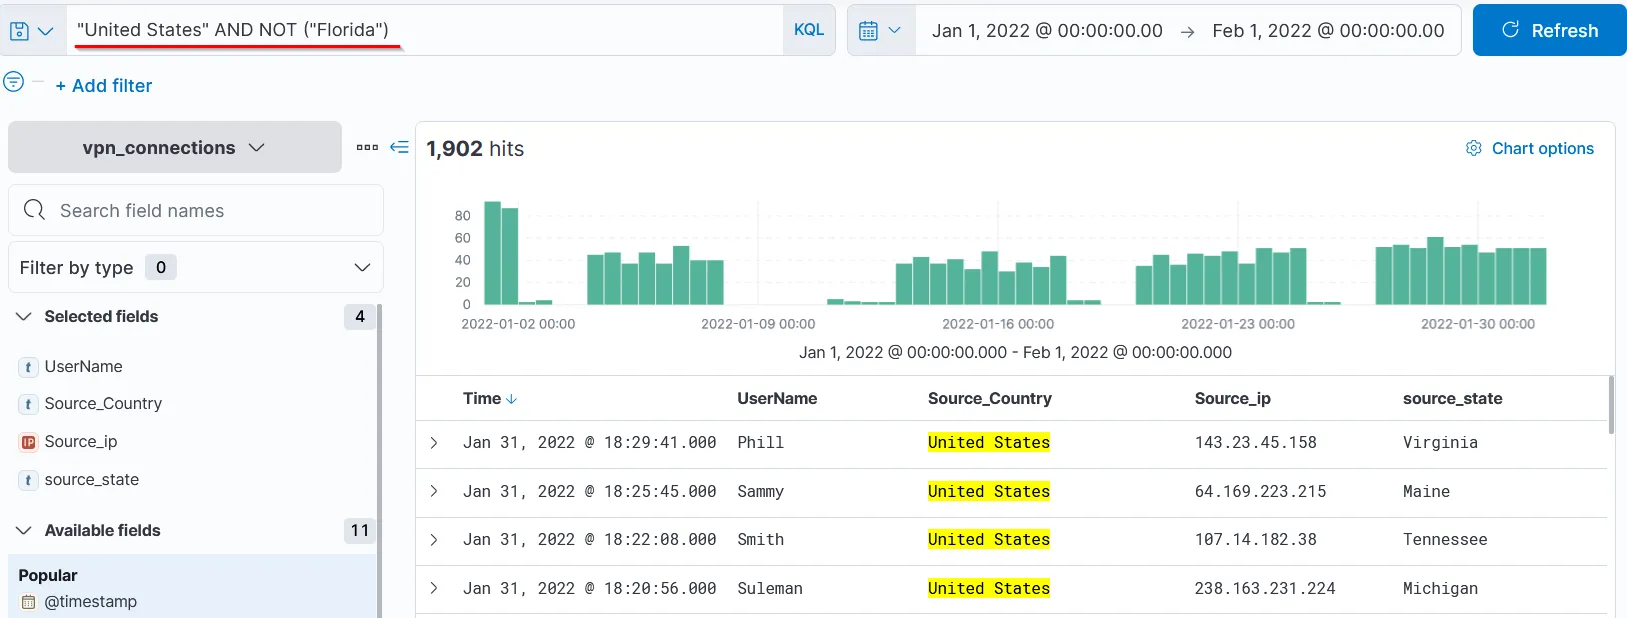
Similarly, we can use the NOT Operator to remove a particular term from the search results. This search query will show the logs from the United States, including all states, but ignoring Florida.
Search Query: "United States" **AND NOT** ("Florida")
Field-based search
In the Field-based search, we will provide the field name and the value we are looking for in the logs. This search has a special syntax as Field: Value. It uses a colon as a separator between the field and the value. Let’s look at a few examples.
Search Query: Source_ip : 238.163.231.224 AND UserName : Suleman
Explanation: We are telling Kibana to display all the logs in which the field Source_ip contains the value 238.163.231.224 and UserName is Suleman.
QUESTIONS:
Create a search query to filter the logs where Source_Country is the United States and show logs from User James or Albert. How many records were returned?
Query used for this search would be Source_Country : "United States" AND UserName : "James" OR "Albert" 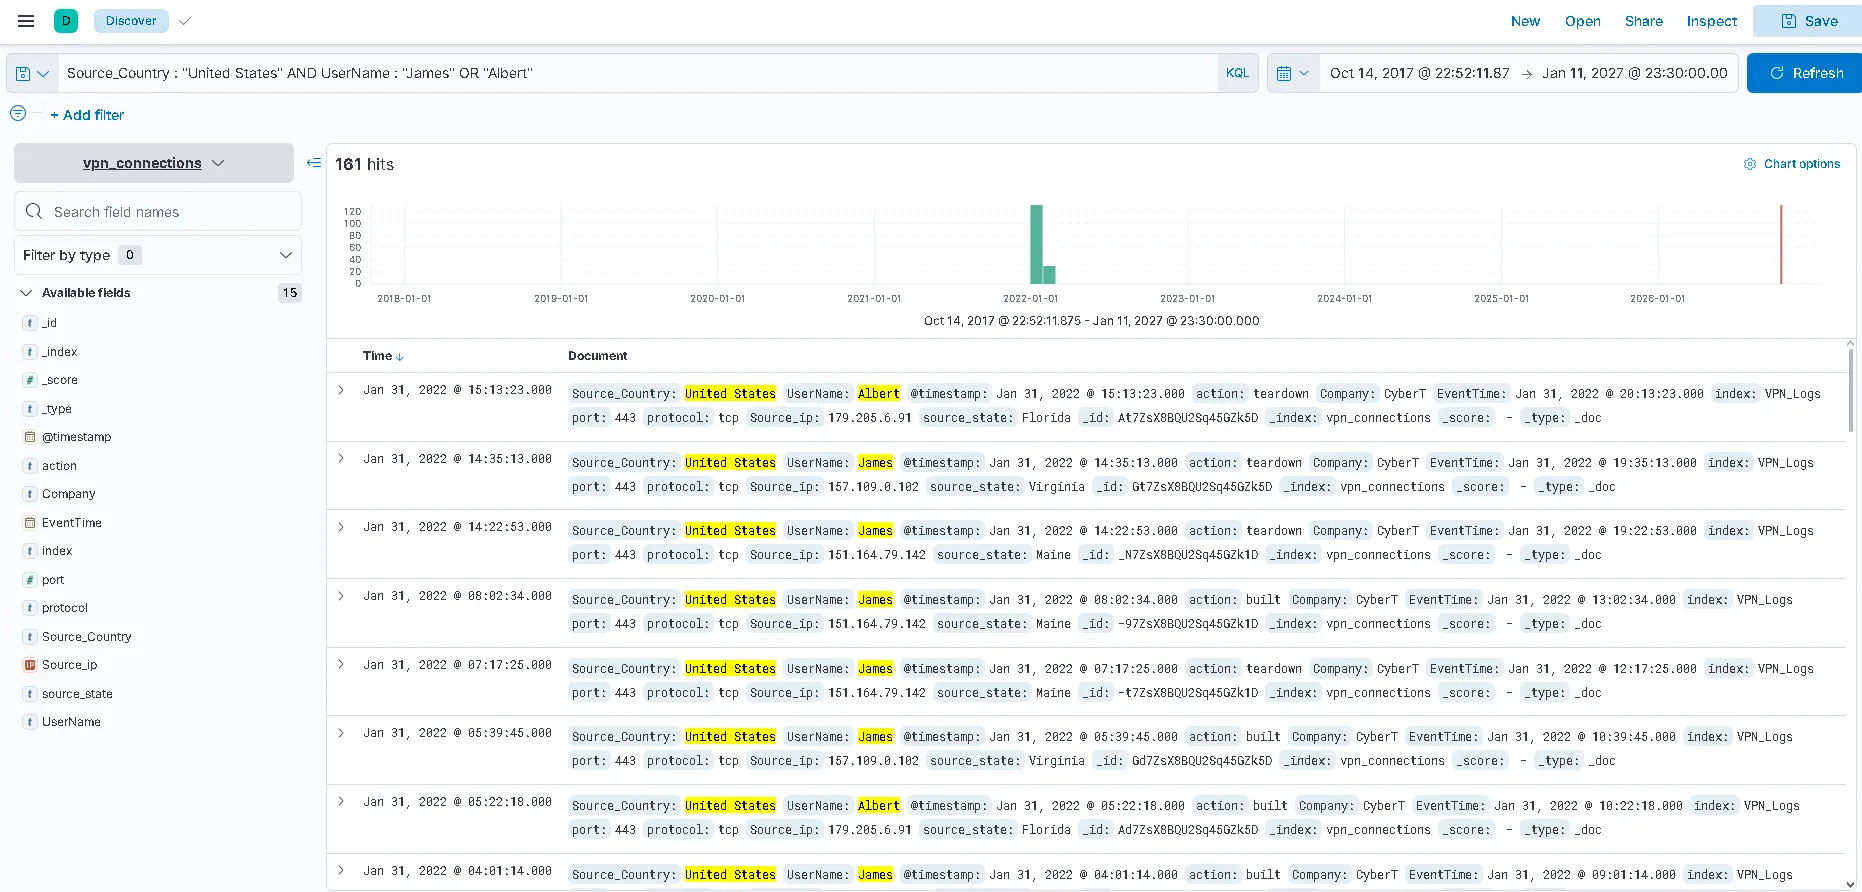 Answer: 161
A user Johny Brown was terminated on the 1st of January, 2022. Create a search query to determine how many times a VPN connection was observed after his termination.
First, set the date for the requested date and also, search for the name Johny Brown, then look at the hits. 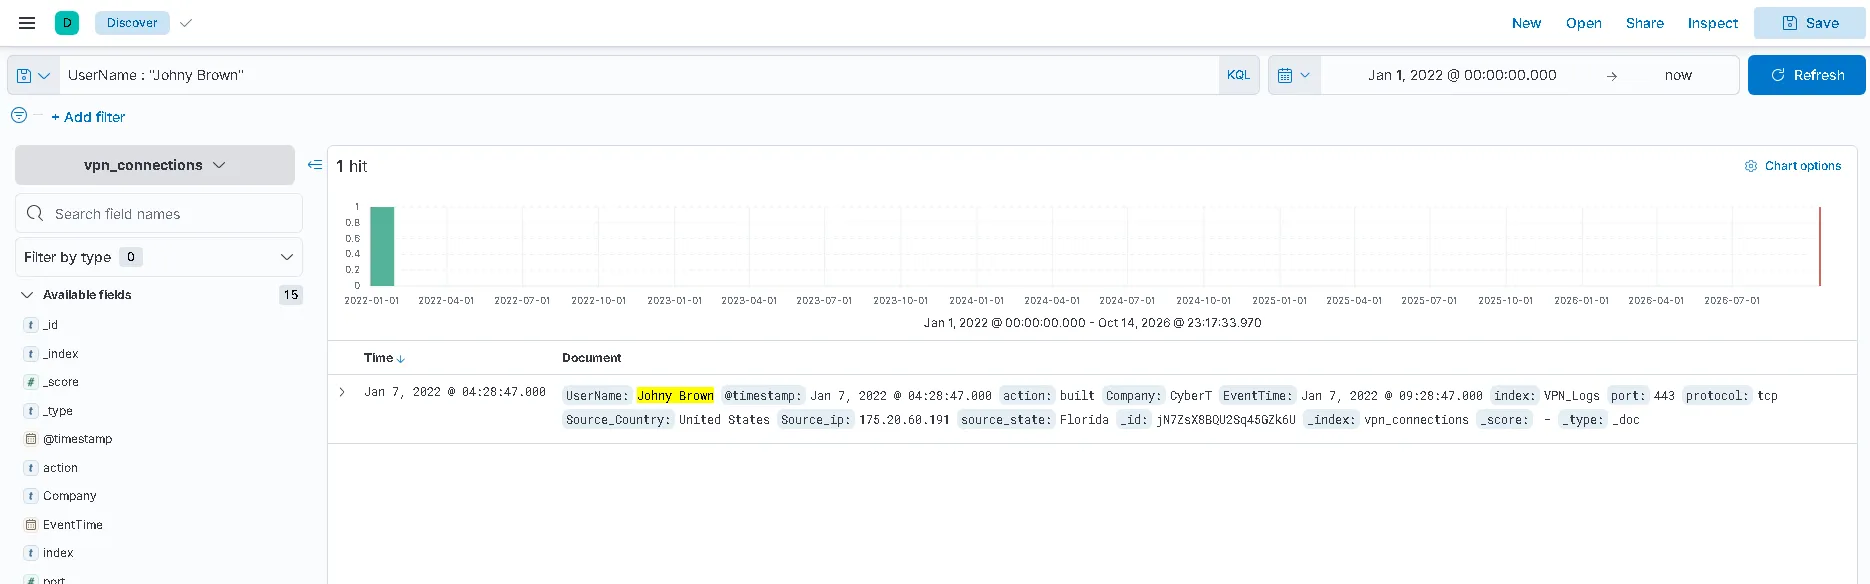 Answer: 1
The visualization tab allows us to visualize the data in different forms such as tables, pie charts, bar charts, etc. This visualization task will use the multiple options this tab provides to create some simple presentable visualizations.
Create Visualization
There are a few ways to navigate to the visualization tab. One way is to click on any field in the discover tab and click on the visualization. We can create multiple visualizations by selecting options like tables, pie charts, etc.
Correlation Option
Often, we require creating correlations between multiple fields. Dragging the required field in the middle will create a correlation tab in the visualization tab. Here, we selected the Source_Country as the second field to show a correlation among the client Source_IP.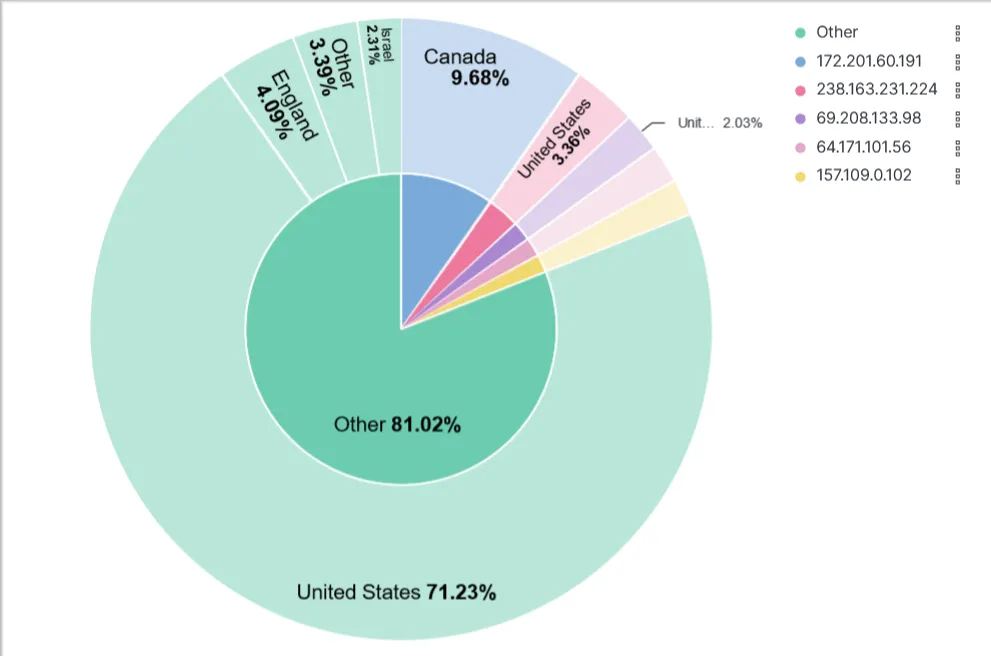 We can also create a table to show the values of the selected fields as columns, as shown below.
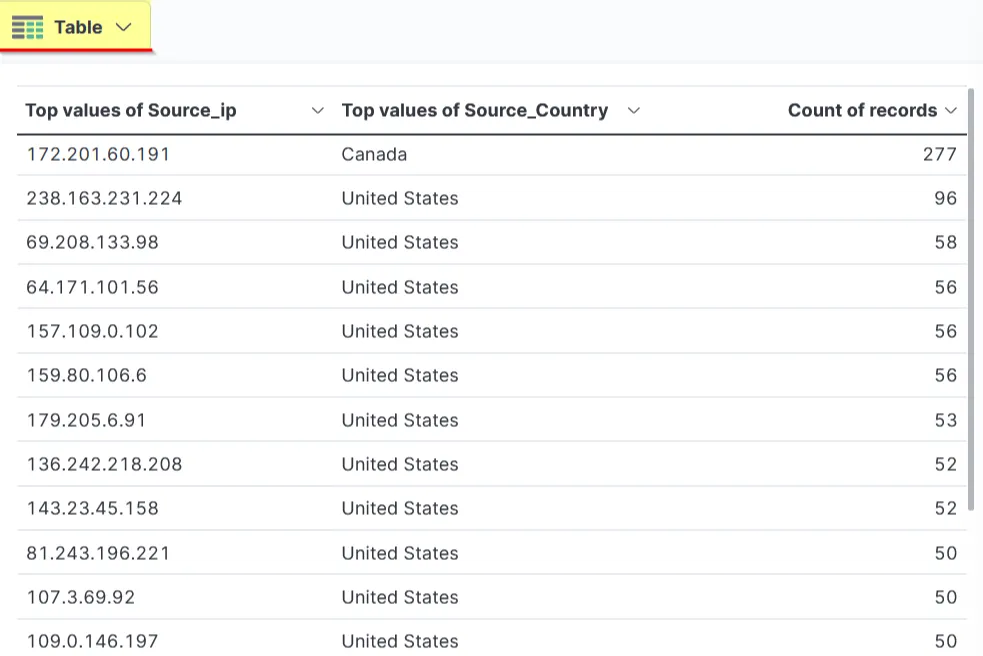 The most important step in creating these visualizations is saving them. To do so, click on the save Option on the right side and fill in the descriptive values below.
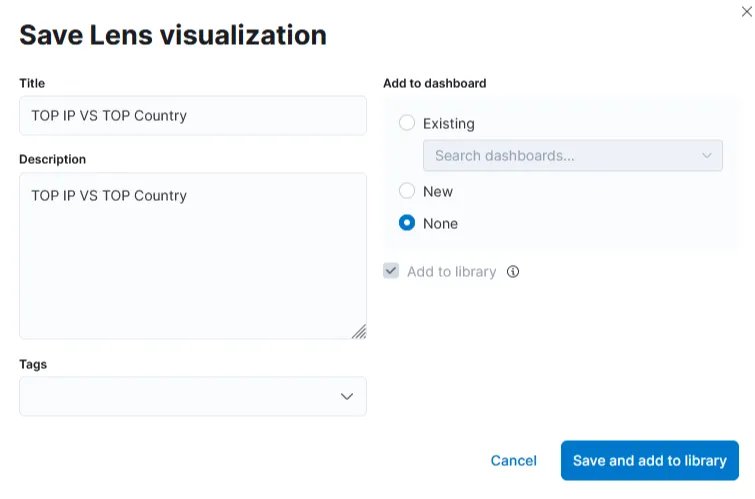 Steps to take after creating Visualizations:
- Create a visualization and click the Save button at the top right corner.
- Add the title and description to the visualization.
- Click Save and add to the library when it’s done.
Failed Connection Attempts Visualization
Failed attempts filter: For the failed connection visualisation, use the vpn_connections data view, set the time picker to include January 2022, then filter for action: failed. Do not exclude failed events; the table should only show failed VPN connection attempts. Use UserName and Source_ip as the table fields.
We’ll use the knowledge gained above to create a table to show the user and the IP address involved in failed attempts.
QUESTIONS:
Which user was observed with the greatest number of failed attempts?
We can make a visualization dashboard where we manually add action is failed (from filters) and the username. 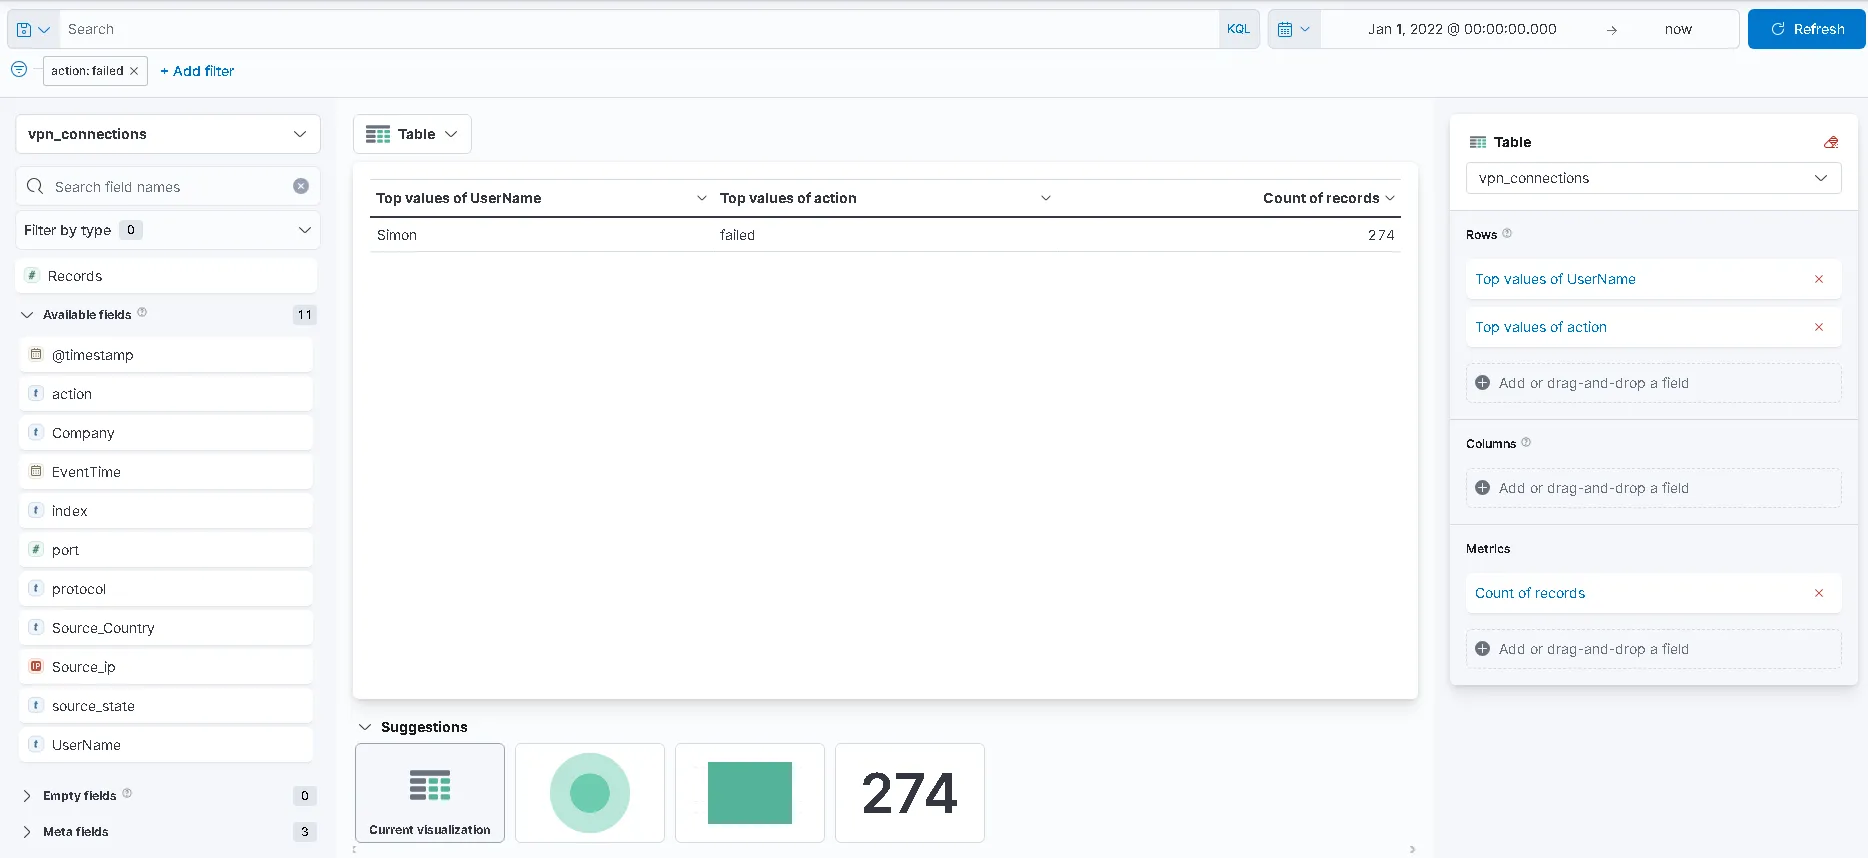 Answer: Simon
How many wrong VPN connection attempts were observed in January? 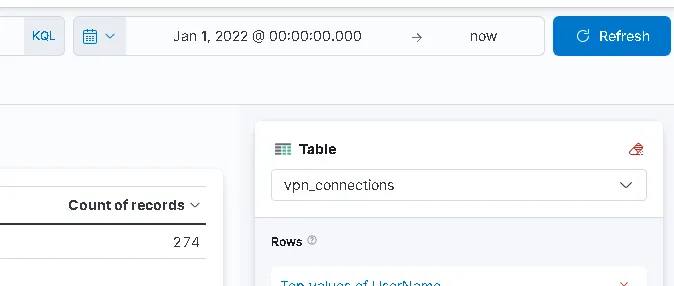 Answer: 274
Dashboards provide good visibility into log collection. A user can create multiple dashboards to fulfill a specific need. In this task, we can combine different saved searches and visualizations to create a custom dashboard for VPN log visibility.
Creating a Custom Dashboard
By now, we have saved a few Searches from the Discover tab, created some Visualizations, and saved them. It’s time to explore the dashboard tab and create a custom dashboard. The steps to create a dashboard are:
- Go to the
Dashboard taband click on theCreate dashboard.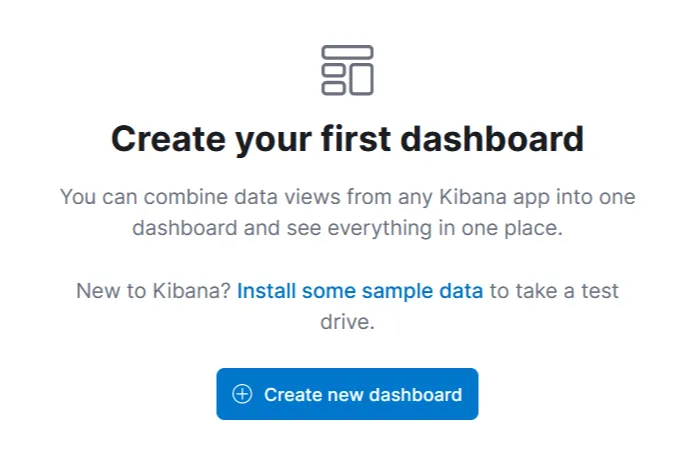
- Click on
Add from Library. - Click on the visualizations and saved searches. It will be added to the dashboard.
- Once the items are added, adjust them accordingly, as shown below.
- Don’t forget to save the dashboard after completing it.